I remember reading about these sensors a couple years ago before they were released, but forgot about them. Luckily, someone from Sensative recently came across thesmartcave.com and offered to send me some sensors to play with. As usual, I received the products with no obligation and all opinions are my own.
I dislike the way most smart home sensors look. Whether they’re placed on doors or windows, if you can see them, I think they look kind of cheesy.
That’s why I prefer to buy sensors that can be mounted flush with the surface so that they essentially “disappear”. The problem with those is that you have to be handy with a drill or chisel to install them.
Or…
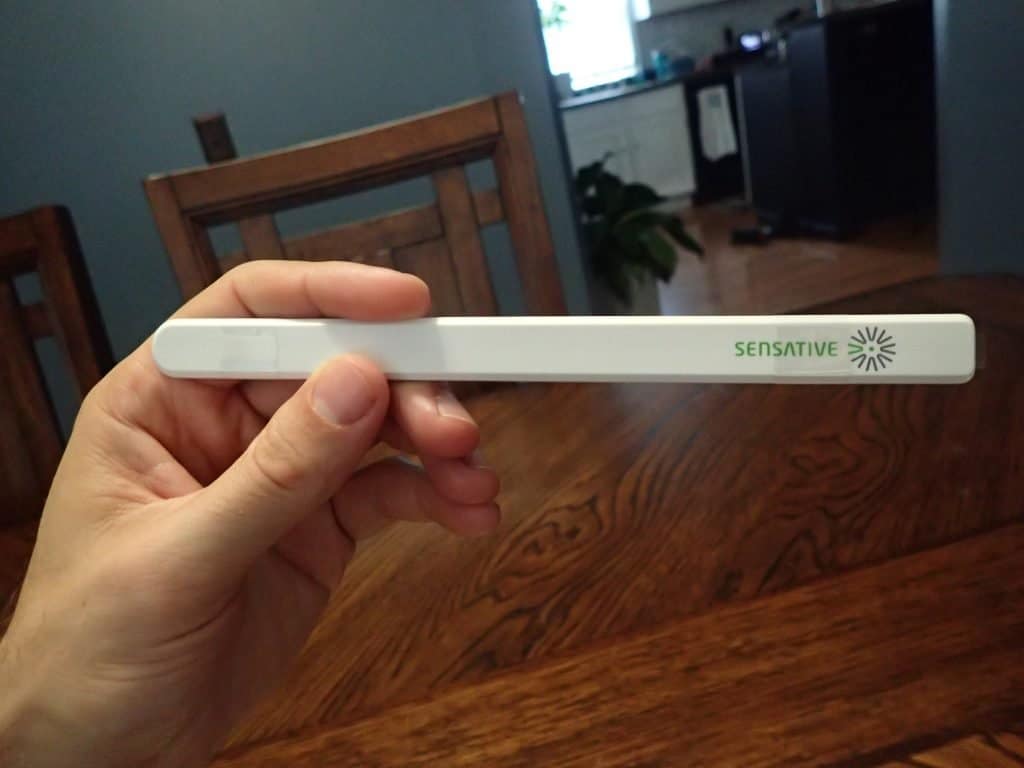
What if someone made sensors so small, they’re hardly noticeable?
That’s the idea behind Sensative Strips.
Overview
- Z-Wave Plus communication (requires Z-Wave hub – I used SmartThings)
- Up to 10-year battery life – make sure device settings are optimized for battery life
- Only 3mm thick – can be easily hidden
- Strong adhesive on the back makes for a tool-less install
- Sealed so it can be installed outdoors
If you’re looking for low maintenance smart home sensors that can be quickly installed and hidden without using any tools, this is the product for you.
Sensative Strips | Check Price
Three types of sensors

The Sensative Strips currently come in three different varieties. Sensative sent me one of each type of sensor.
Strips Guard
Guard is an open/closed sensor best for doors, windows, drawers, etc.
I put the Guard on my back door. This is the door that we use the most often. Once I got it setup correctly, it has been 100% reliable and very fast to respond.

My old ugly sensor 
The new Strips Guard. It’s kind of hard to see but that’s the point, right?
Strips Drip
Drip detects water leaks and also includes a temperature and light sensor. It can be installed in a leak area or directly on pipes to warn of potential freezing.
I have a roof leak that I haven’t fixed yet. When it rains really hard and the wind blows the right direction, I get water in my kitchen. It caused some damage on the ceiling. I set the Drip on top of the cabinets where the leak is.


Note: You must install the Drip on the included blue mounting plate. There are two sponge-like moisture pads on the mounting plate which wick moisture from the surface (in the event of a leak) so that it can register on the sensor. Without the mounting plate, you will likely get constant false “leak” alerts.
Strips Comfort
Comfort includes a light sensor and a temperature sensor best for controlling heating, cooling, or blinds.
I simply set the strips comfort on the window in my guest room. My home will be getting new windows soon, so I didn’t stick down the strip permanently. It doesn’t blend in very well with the wood windows, but it would blend in great with a white vinyl window.

Tool-less installation
The strips have an adhesive backing which lets you install them just about anywhere without using any tools. The mounting plates also have adhesive backing.
However, the adhesive on the mounting plate may tear the paint off if you try to move the strips at some point. If you’re worried about that, you can attach the mounting plate with included screws instead of using the adhesive backing.
Including can be a tedious process
In case you’re not familiar with Z-Wave, the “include” process is how Z-Wave devices are added to the hub.
The strips are shipped in auto-include mode. The instructions say to put your hub in include mode. Then, remove the magnet and the strip should automatically be included.

However, I couldn’t get the auto-include to work with my SmartThings hub.
Instead, I followed the directions in my SmartThings app to connect:
Manually including the strip requires using the magnet to “wake up” the strip. You do this by waving the magnet over the end of the strip 3 times within 10 seconds. Then, you wave the magnet over the strip a final time to complete the process (see below image).


Install inside or outside
The sensors are completely sealed so they can be mounted outside and they’ll be rain proof.
Also, these strips are rated for use in temperatures as low as -4F. So, if you live in the North like me, you may have some issues with an outdoor install during the coldest weather.
Avoid mounting on metal
The general rule here is that if the surface is magnetic, it can cause interference with the wireless signal.
That said, the door I mounted my Strips Guard on has steel on the outside and inside surface, but the core is not. I mounted the strip to the wooden door frame and stuck the magnet to the top of the door. Neither piece was mounted directly on the metal, but there is a fair amount of metal near it.
Although I got it to work perfectly, I think my difficulties described in the next section may have been caused by the surrounding metal.
Test before you mount permanently
The adhesive backing on the Strips is really strong. Once you stick it down, it’s not moving. I don’t know how fragile these devices are, but it seems like it would be difficult to remove the strip without damaging it once it’s been stuck down.
Therefore, make sure you test that it’s working correctly before you stick it down permanently.
I learned that this is especially important for the Strips Guard. In addition to requiring a reliable signal, you need to be sure that the Strip and the magnet align properly for the open/closed signal to be accurate.
My first attempt at installing the Guard failed.
The door I installed the Guard on is out of square. Therefore, there is a 1/2″ gap between the door and the frame on the top of the door where I installed the Strips Guard.
Initially I lined up the Strip and the magnet and temporarily stuck them in place with the Strip on the door frame and the magnet stuck to the top of the door. I tested them with the door opened and closed and they worked. So, I stuck them on permanently.
Later that evening, I locked the deadbolt right before bed. Since the door is out of square, I have to give it an extra shove with my hip while simultaneously turning the deadbolt to get it to latch. The door closes an extra 1/8″ when the deadbolt is latched. That extra 1/8″ was enough to cause the sensor to switch to open.
If at first you don’t succeed…
Luckily, I was able to carefully pry up the rectangular magnet without damaging it. Then, I placed a piece of foam rubber underneath the magnet so that it was positioned closer to the Strip when the door was closed.
This worked perfectly. With the magnet closer to the Strip, the sensor was much more forgiving. It has reported the open/closed status perfectly ever since.
Permanent batteries with a 10-year life
My main concern about these sensors is battery life. Sensative Strips are completely sealed and therefore their batteries are not replaceable. That means when the batteries run out, the sensor is basically garbage and needs to be replaced.
Fortunately, the batteries can last up to 10 years. The 10-year battery life hasn’t been confirmed in real world use yet (they have only been available for a couple years), but Sensative did get a third party to analyze their battery and energy use:
They did the test on the Strips Guard and assumed 12 opens and 12 closes per day. Under these conditions, the report found the strip could last up to 28 years when no Z-Wave extender was used and up to 16 years when a Z-Wave extender was used.
TIP: If your strips connect directly to the hub, they will use less battery than if they connect through an extender node.
For what it’s worth, I’ve been using the strips for 2 weeks, and they are still reporting 100% battery life. I’ll be sure to update my battery status as more time passes.
Make sure your hub is optimized for battery powered devices
I browsed through some other reviews of the Sensative Strips and many people have reported battery life of 2 years or less. To me, that indicates either a product malfunction or a setup problem.
I suspect it’s a setup problem.
Sometimes a hub can frequently request status updates or something else that keeps a battery-powered device transmitting and using energy when it should be dormant. When a battery powered Z-Wave device wakes up and turns on its radio, it uses 10,000 times more battery power than when it’s asleep. Obviously, that’s terrible for battery life.
It wouldn’t be the first time a Z-Wave product chewed through batteries way faster than it was supposed to due to incorrect setup. Don’t let that be you. Sensitive has written an article about how to optimize battery life here.
If you’re reading this thinking, “I have no idea how to access or adjust these hub settings he’s talking about,” don’t worry! Not all hubs require user configuration.
If you use SmartThings (what I use), you don’t have to worry about using the correct hub settings because the device handler for the strips already has the correct settings. It’s relatively fool proof.
Final Thoughts
So would I buy the strips myself?
- Guard – Yes
For me, the most useful of the strips is the Guard. The ability to install a sensor between the gap in a door is pretty awesome. I am going to continue using the one I have for a couple months, and if it keeps working well, I will buy another one for my front door. - Comfort – Maybe
Once I get my shades/blinds automated, it would be nice to have one on each side of the house. However, some of those systems come with light sensors so the Comfort sensors may not be necessary. - Drip – Probably not
I don’t have a pressing need for a leak sensor, and if I did I could get by with a cheaper one. Most of the places I would put a leak sensor are already hidden so an ugly bulky sensor would be just fine.
The price is definitely higher than most other sensors, but the strips work great. They’re responsive and reliable. They’re super-easy to install and there’s basically zero maintenance for the life of the sensor.
If you’re willing to pay extra up front for zero-maintenance and discreet appearance the Sensative Strips are the best I’ve found.